Sign up before Nov 15 and get one year free (100$ worth)
Please correct the error(s) above!
Thank You!
We received your information and will get back to you!
We're sorry!
Something went wrong. Please try again later.
AirSend service will reach End of Life (Dec 31, 2022) and is going open source. Please export your channel data (actions, files, wiki, and messages) from AirSend for safekeeping.
May 1, 2020
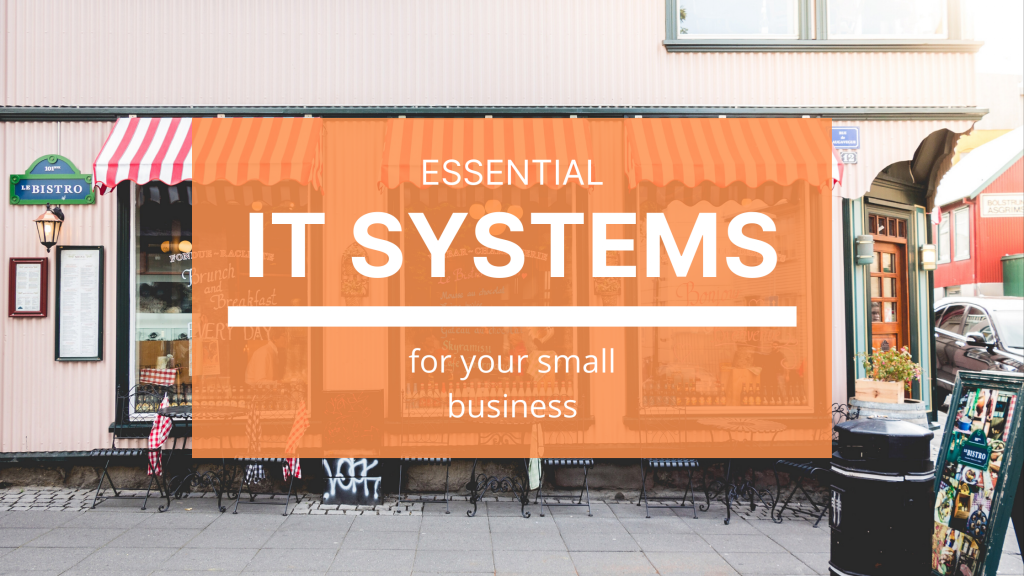
Must-have IT Systems for Your Small Business
Category: Productivity
Must-have IT systems plan for small businesses.
Great! You’re starting a small business or looking to upgrade your existing small business by incorporating some better technology. But with all of the tech products and services out there, where do you even begin? Those of us who have tried and failed and tried again know that it can be tough trying to find the right mix of tech products and services. That’s why we’ve written this must-have IT systems plan for small businesses so that you can feel more comfortable putting together something that works well for you.
What is your budget?
The first step of the process is to figure out your budget.
Different tech products and services charge in different ways. Some make you
pay upfront for an entire year. Others automatically charge your credit card or
bank account at the beginning of every month. Because of these differences,
it’s best to come up with an overall annual budget and then multiply the
monthly charges by 12 when calculating whether or not you can afford something.
The four categories of technology for your business
No matter what type of business you’re running, tech tools
usually fall into one or more of the following categories:
Communication
Knowledge Sharing
File Storage and Management
Line of Business Apps
And you will usually need to have at least one tech tool in
your set-up to cover each of the four categories. The rest of this post will
explore what functions these categories fulfill and some popular apps for each.
Communication
Source: unDraw
All businesses need a way to communicate with others, and
most have several. This category includes email, text messaging, chat apps, and
more comprehensive platforms like AirSend
or Slack which include chat but also contain other capabilities.
Here are some popular tech products and services in this
category:
Like Gmail is standard for email, Zoom has become the
standard for video conferencing. The free version of Zoom lets you have calls
up to 40 minutes long, which is more than enough for most meetings.
For team chat, use AirSend. It’s better than Slack because
of the read reciepts. You can also easily create different channels to work
with external teams.
Olark allows you to run live chat windows on your website.
It’s easy to use and has good support.
Knowledge Sharing
Source: unDraw
Knowledge sharing tech tools refer to tools that you use to
store and share business information. This information can be company
documentation, weekly to quarterly reports, or even to-do lists.
Trello is great for task management. The UI is smooth, and
the UX is satisfying. AirSend also provides task management, so if you don’t
want to minimize the amount of apps in your set-up you can just use AirSend.
This lets you self-host a private, online forum where you
and your team can post reports and updates. (We’ve also used it to collect
entries and entry votes for our company Olympics where we made themed GIFs to
win prizes.)
FileCloud is a secure file repository where you can store
and organize files. It’s a very powerful file management tool that has a drive
client and sync capabilities.
Dropbox and G-Drive are pretty easy-to-use and other popular
solutions for file storage and management.
Line of Business Apps
Source: unDraw
Line of business apps are everything else that doesn’t fall
into the first three categories and are usually specific to your industry.
For example, a line of business app for realtors would be
the MLS. For lawyers, it might be Practice Panther – an app that helps lawyers
create templates for various law documentation.
We’re not going to recommend anything specific here because
it really depends on what type of business you own, but an easy way to find
line of business apps is to Google “best apps for…” and insert your profession.
Ready to make an IT plan for your business?
After reading this post, you should feel more prepared to
make a minimal IT plan for your small business. Just determine your tech
budget, take note of the four categories, and choose the apps that work for you
in those categories. Our recommendations can help you do that.
Welcome back to our podcasts series! It’s been a while since we last made one of these, and with all the hubbub going around, we felt that it might be time to make another post on the latest podcast. Today’s theme is going to be productivity. Without further ado, let’s dive into the best three productivity podcasts of 2020.
With a rise in companies moving to remote work, it is only natural that we would feel unproductive. When we are at home, we don’t usually want to do things related to work. BUT, with Gary Vaynerchuck, vlogger, investor, and CEO, we are bound to feel some sort of inspiration to be productive.
The GaryVee Audio Experience is a podcast about getting work done through inspiration, keynote speeches on marketing and business, interviews, fireside chats, and thoughts from Gary Vaynerchuck himself. The majority of his episodes are over an hour-long, but it is worth the listen to when working or even relaxing. In this blog post, we are going to focus on one of our favorite episodes to give you a feel of what the podcast is like.
You Need to Focus on The Process
In essence, this 16-minute episode talks about how we need to block out the outside noise and focus on the process. Do not judge yourself. Make decisions, correlate it to your calendar, do not overthink, and make the right call at that moment, and just move.
Though the majority of his episodes are business and marketing-driven, his episodes can apply to anyone. Anyone looking to move forward, to be inspired, to make a change, and essentially to hustle.
At the title indicates, this podcast is designed to help you get focused and stay focus. Focus on This is the perfect podcast designed to help you stay productive. Hosts, Courtney Baker and Blake Stratton provide weekly 30-minute productivity tips, guidance, and more.
The episode we will be focusing on is episode 30: 5 tips for staying focused while working from home.
Episode 30: 5 Tips for Staying Focused While Working from Home
In this episode, the hosts discuss why daily rituals are important, which components of your rituals can stay the same, ideas for how to replace workouts and family activities when your schedule is thrown off, the one practice everyone needs to maintain to help avoid distractions, and suggestions for finding the “focus spot” in your home.
Some key advice that they mention is to one, double-down on rituals. Your morning and evening rituals can stay the same, however, learn how to shift from workday rituals to work-at-home ritual. In other words, figure out your workday startup, and transition it to working from home.
Secondly, lean on your big three. Your top three tasks that you will take on for the day. To be an overachiever, you should also list your weekly big three. The daily big three and weekly big three are the backbones of focus.
Finally, find your focus spot in the house. Where in your house can you get into the zone and work without distraction? We mention some ways on how to create the perfect focus spot, here.
Beyond the To-Do List is a podcast series dedicated to providing tips and strategies for maximizing productivity in all areas of your life. Host Erik Fisher interviews people who are implementing productivity techniques in their own careers and personal lives. This podcast is a great listen to because not only does it feature successes, but it also features failures and the lessons learned from them. The episode we will be focusing on is Daniel Clark on Using Music for Better Focus, Relaxation, Sleep, and Meditation
Daniel Clark on Using Music for Better Focus, Relaxation, Sleep, and Meditation
In summation, Daniel Clark, CEO of Brain.fm, encourages focus, productivity, relaxing, etc, through an AI-driven music program. The whole goal is to get you to feel focus, relaxed, etc. through music. The result is bringing out the best version of yourself.
Summation
There are plenty of podcasts out there that are great for productivity, and while we did not mention them this time, we do plan on making more productivity podcasts posts. We know we have barely scratched the surface of productivity podcasts. Stay tuned for another post on the next best three podcasts of 2020.
AirSend is a versatile digital workspace to share files, send messages, and complete tasks. See how AirSend can help you.
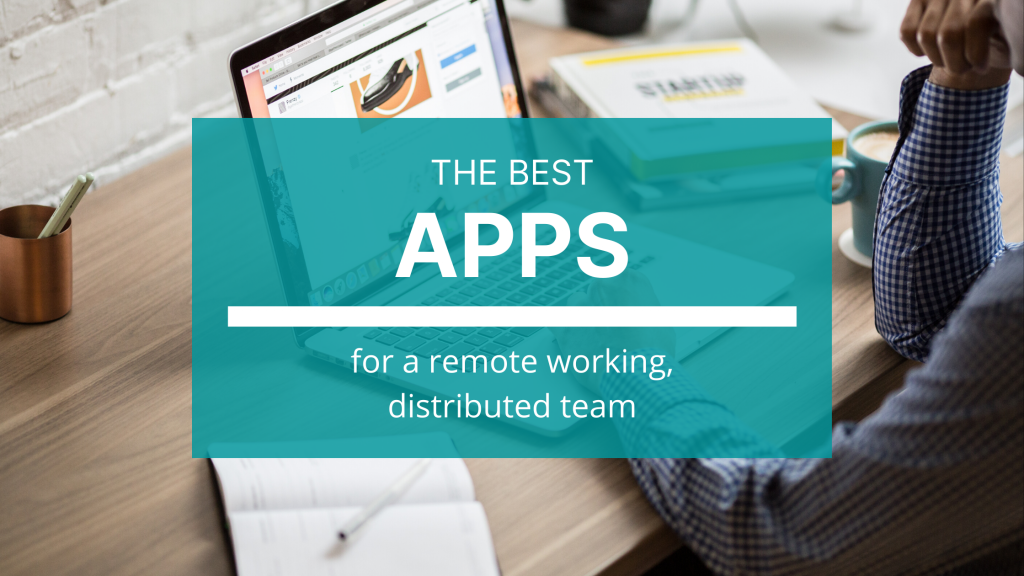
Here are some of the apps, tools and services we use to run our remote working marketing team.
Our in-house marketing team members come from four different countries (USA, Canada, India and Hungary). We use external freelance writers for some of our content creation efforts. We also work with an Austin based PR agency (Treble PR) for our public relation campaigns. As a team we are responsible for marketing the following products: FileCloud (#1 Enterprise File Sharing) and AirSend (Simple Communication Platform for Clients and Teams).
Here are some of the apps, tools and services we use to run our marketing team. We use a mix of self-hosted tool and SaaS products. Some of them are well-known, and some of them you may or may not have heard of. We’re sharing this list because we think it might help marketing or other small teams like us.
Because the list is pretty long, I’ve divided the apps, tools and services into seven categories: communication, knowledge sharing, file management, content creation, content delivery, marketing analytics, and all others. Here they are:
Gmail is self-explanatory. It’s the gold standard for email, with good spam protection and cool features like smart compose.
The good: we’re not paying anything for G-suite because we were early adopters and are still getting it for free.
The bad: the only downside to Gmail the team can think of is that, while the iOS app is good, it lacks some functionalities available in a web browser like templates.
Zoom – Video Conferencing, Webinars, and Company-wide Calls
For webinars and company-wide calls, we use Zoom. We also use it for market research interviews and our other video conferencing needs with both free and paid accounts.
The good: it’s great that the free version of Zoom lets you have up to 40 minute calls, which is more than enough for most meetings.
The bad: Zoom isn’t good for one-on-one calls, the Mac client glitches sometimes, and we don’t like that the app starts when you click on a meeting link in your browser when it would be more convenient just to have the call in the browser. The recent security issues are also a concern.
For team messaging, we use AirSend. It’s better for us compared to Slack because of the read receipts, Office 365 integration, and email to channel capabilities. We can also easily create different channels to work with external teams like our PR firm and freelance writers.
The good: the clean, clutter-free UI is great, and the built-in task management tools, file management system, and share notes help us bring everything into one place in terms of collaboration.
The bad: AirSend doesn’t have as many integrations as Slack currently.
Olark is what we use to provide and run the live chat windows on our product websites.
The good: it’s easy to use once integrated, and they offer good support.
The bad: it can get expensive if you have multiple websites.
Email Marketing
Sendy – Email Sending and Tracking
We use Sendy to send and track a portion of our larger email campaigns. It has a simple UI and is pretty reliable.
The good: Sendy is reliable and cheap (around 10 times less expensive than MailChimp.
The bad: in order to design professional-looking emails, you need to know html.
MailChimp – Email Sending and Tracking
The rest of our email campaigns are done through MailChimp. The platform is easy-to-use, with drag-and-drop capabilities to create beautiful emails without needing to know any coding.
The good: reliable and easy to use.
The bad: it can get pretty expensive. We pay $300+ for it every month.
Though our teams are currently using Trello, we are transitioning our task management to AirSend to be more streamlined. Nonetheless, Trello is a wonderful task manager. The UI is smooth and the UX is satisfying.
The good: users can create unlimited cards, apply labels, use checklists, write descriptions, and add integrations. Trello is also known for its aesthetic backgrounds.
The bad: you have to scroll through everything until you find what you’re looking for, which is an issue when you have a long list.
We use BookStack for internal company documentation and host it ourselves. Other Wiki tools like Confluence can become very expensive as the number of users increase. That’s why we moved from Confluence to AirSend as our company grew from four people to over fifty people.
For weekly team and individual activity reports, we use another self-hosted tool called Discourse. It basically allows us to self-host a private, online forum. We’ve also used it to collect entries and entry votes for our company Olympics where we made themed GIFs to win prizes.
The good: it’s effective and fun to use.
The bad: you have to be at least a little tech savvy to set it up and start using it.
We use FileCloud as our secure file repository. It’s a very powerful file management tool that has a drive client and sync capabilities. This is where we keep our invoices, resumes, receipts, tax records, etc. We also keep our marketing images, interview recordings, research PowerPoints, and other team materials here.
The good: FileCloud makes it very easy to upload, organize, and share files.
The team uses both Microsoft Office and G-Suite to create and edit documents.
Some pros: easy to use, lots of capabilities, standard which makes collaboration streamlined.
Some cons: with Microsoft Office in particular, you’ll need a paid account to easily look at and edit documents, which can get expensive.
Native Mac
– Screenshots and Video Recording
Team members with Macs use command + shift + 5 on their Macs to record their screens and take screenshots for product explainer videos, GIFs, and product images.
The good: it’s easy and quick to use, and comes with your Mac. Also, videos come in MOV format, which can be directly edited in iMovie.
The bad: if you don’t have a Mac, you can’t do this.
To record videos, team members with Windows use OBS Studio. It’s a video/screen recorder with better video quality and speed than other apps we’ve tried. After recording, all files are sent to a designated folder of your choosing, and other built-in tools, like streaming, studio-mode, fades, audio mixer, and scene transitions make it a streamlined and powerful tool.
The good: like DaVinci Resolve, the UX is easy to learn.
The bad: recordings are MKV files, which do not work with DaVinci. The solution is to use a video converter.
Team members with Windows OS use DaVinci Resolve to make product explainer videos and other videos. It’s an easy-to-use tool for beginner video editors. Though it looks complicated at first, the UX is actually really simple.
The good: those who are brand new into video editing find it simple to learn how to use, you can organize projects into folders, and it’s free.
The bad: the product has shut down on several occasions in the middle of use. So definitely save your work every 5-10 minutes.
Team members with Windows also sometimes use Snagit to take screenshots and make GIFs.
The good: it’s a simple, free screen capture software that makes things easy for quick projects that require minimal editing.
The bad: it’s not as smooth to use as the native Mac screenshot tool.
Voice
Recorder – Video Audio and Interviews
To record
voiceovers for videos and record market research interviews, we use the voice
recorder app that comes with our computers. It’s convenient and pretty self-explanatory.
To create more detailed design mock-ups, we use Sketch.
The good: unlike Balsamiq, you can create very life-like designs that look exactly as you imagine the UI or website will appear once it is built.
The bad: because it is a more specialized product, not everyone you work with will have it and be able to open and view Sketch files. But it is easy to export Sketch files as PDFs, so this is not a big deal.
Canva makes it easy to find images and patterns and make visual content. Though there are paid and free versions, we recommend you use the paid version for your business. We use Canva to make our social media images and blog banners.
The good: you can create your own brand kit, upload photos, and create customized content without the skills needed to use tools like Adobe Illustrator.
The bad: more money out of your pocket. But worth it.
For illustrations for our blog posts (like the ones you see in this post), we use unDraw. It’s a free library of illustrations that you can download and use in your projects.
The good: we like it because you can customize the color and because it helps create consistent visuals in your blog free of charge.
The bad: we have gotten feedback from a designer with a more keen eye that it’s obvious the images are stock pictures.
We use Buffer to manage and schedule social media posts. The paid account allows you to manage more than one social media account, which is helpful for us.
The good: the design is simple, which makes it easy to use, and re-sharing posts is much simpler with Buffer than without.
The bad: sometimes the website can crash, causing you to lose your posts. There is also a limit on file size when posting media, and there is some lagging on the website when scheduling posts. Also, it costs extra to analyze posts.
We also use HootSuite to manage and schedule social media posts. Hootsuite is more expensive and can appear more complicated to use, but it has more features than Buffer, such as automatic scheduling at peek times. On a basic level, they do the same things though.
Google
Analytics is a data analysis tool by Google which records all user actions on
the website. We use this tool to check our website traffic, specific page
traffic, blog traffic, some specific user actions, like registration form
submissions etc. Basically, this tool shows a dashboard view to many such user
actions happening on our websites. we can create custom reports, check users
coming from various sources and generate many marketing insights to manage our
marketing activities.
The good: Google analytics is probably the best and closest tool to data analysis for any website and all other tools integrate with GA to get more data.
This tool is another data analysis and research tool which has a few more data points compared to google analytics. We can create some projects to check specific pages, keywords and track our SEO rankings. SEMrush is also very good with research, so you can find keywords, new topics which are trending on specific keywords and much more. One more area we use this tool for is competitors analysis.
The good: we can track competitor rankings, competitor topics, backlinks, compare pages, keyword rankings and much more.
The bad: there aren’t many cons, but you may have to buy extra packages for a lot of useful reports even thought you’re already paying a lot. Feature wise, their keyword research tool could be a little better, but it’s decent enough.
Answer the Public is a SEO shortcut that has saved us a lot of time. It puts together autocomplete data from search engines and gives you every relevant phrase and question people are searching for around your keywords.
The good: it’s a quick and easy way to come up with blog post titles.
The bad: the free version only lets you do three searches per day.
To see how potential customers are experiencing our website and find ways to improve, we use Inspectlet. The tool records videos of every person visiting your website so you can see how long they stay on each page, where they scroll, and what they click and look at.
The good: it’s a very useful analytics tool to help you make a better, more effective website experience.
As a team grows, a necessary tool is something to contain and share information like product social media account log-ins and email address log-ins. To keep our shared account usernames and passwords safe and in one place, we use KeePassX.
We create market research and product feedback surveys using Google Forms. It’s free and easy to make and send surveys this way.
The good: we like the integration with Google Sheets, which takes all of the survey responses and puts it into a Google Sheet that is automatically updated each time there is a new response.
The bad: it’s hard to make it look as fancy and nice as Survey Monkey surveys.
Last but not least, we use YouTrack to create, track, and complete product tickets. This is self-hosted to save us money.
The good: this is an easy way for the marketing team to share information with the development team about bugs or other feedback from customers. You can also create wishlists in YouTrack.
The good: you can embed Calendly forms into your website or send a link, and all scheduled calls show up in your calendar so that you don’t miss anything.
The bad: none so far.
What apps do you use?
As you can see, we use quite a few different apps, tools and services to run our marketing team. We hope that sharing this list and talking about our likes and dislikes of each one can help you find the right mix of apps for your needs.
Happy working!
The AirSend and FileCloud Marketing Team
All of the information you need to create the best virtual home tours for your clients.
As technology and global events continue to transform the world we live in, it’s important that we as real estate agents don’t fall behind. Virtual home tour technology has been around for a while, but many still overlook it when building our real estate business. Instead, we repeat the same mistakes over and over again when trying to attract home buyers which costs us time, money, and clients.
We all want to avoid the pain of coming to the end of a listing contract without having sold the home. To do so, we need to gain a better understanding of virtual tours and how to implement them in their selling process. A good virtual tour, or real estate video tour, can be an important part of the home buying experience that saves the agent time and makes both the seller and buyer very happy.
The rest of this article will give you all of the
information you need to create the best virtual home tours for your clients.
What is a virtual tour?
Source: unDraw
One of the problems in our industry is that everyone has a
different definition for “virtual tour,” and few virtual home tours actually
address the needs of the buyer market. Some people call video walkthroughs
virtual tours, others provide navigable 3D models, and yet others say that
photo slide shows are virtual tours.
While there is no right or wrong answer to the question, the
important thing is that your virtual tour sees the home from buyers’ eyes,
displays the home well, and highlights the key features that potential buyers
are looking for.
Here are some additional qualities of an effective virtual
tour:
The tour uses real footage of the house and is not a digital recreation.
You can easily access the tour using a web browser or phone.
The technical aspects of the tour are good quality, such as fast load speed and high image resolution.
The tour complements the home’s best aspects and backs up your other marketing materials.
The tour gives buyers the feeling of going to the home in person.
How to create a good virtual tour experience
Now that we know the basic characteristics of a good virtual
home tour, it’s time to talk about how you can make one for your clients.
Whether you choose to use 3D home tour technology, a video camera, or your
phone to create the tour, follow the steps below for the best results.
Step 1: Stage the home
Source: unDraw
Buyers are looking for a place they can imagine living in
and displaying an empty house does not help their imagination. Most people need
furniture and décor to provide a sense of familiarity and scale. The key is to
strike a good balance. Too much clutter and staging can steal attention away
from the actual home. Too little can make the space seem impersonal. If
interior design is not your strongest skill, consider hiring a professional
stager to help. This step can make or break your virtual home tour.
Step 2: Have good lighting
Anyone who’s taken a selfie knows that lighting makes a
difference. Just like various lighting can make your nose look cute or huge,
lighting in a house effects buyers’ impressions. Always avoid dim or moody
lighting and make sure that lighting is consistent everywhere in the house.
Also try to choose the best time of day to take your videos and photos
depending on the direction that the home faces. By putting together ample
daylight with well-placed artificial lighting, you will be able to best capture
each space in the home.
Step 3: See from the eyes of the buyer
Source: unDraw
Since the best virtual tours mimic the experience of a real,
in-person house tour, think from the perspective of the buyer. What would a
buyer want to look at? Where would they go? Every view you choose to pause at
should be a natural place where someone would stop in a room. Quick tip: people
tend to linger at windows with interesting views and landings that overlook
other parts of the house. Make sure your virtual tour feels like an authentic
experience.
Step 4: Highlight the best and special parts of the home
Just like any other marketing collateral, you want to
highlight the best aspects of the home in your virtual tour. Even though some
parts of a home don’t seem important, they can show off the unique personality
of the space. Part of this is remembering to show the outdoor areas of a home.
Start the virtual tour with a street view so that buyers know what it’s like to
walk up to the house from their car. Also include any patios, gardens, or other
outdoor living spaces.
Step 5: Make it a whole package
Source: unDraw
Consistency is important when it comes to the marketing
materials. Make sure your photos, brochures, and floorplans match the image of
the home that you have conveyed in your virtual tour. When everything works
together, your buyer will feel like they have visited the home even before they
step through the front door. If there are inconsistencies, you will lose their
trust and, most likely, their business.
Step 6: Choose the right delivery system
Once you have put together a complete marketing package with your virtual tour, 2D photos, brochures, and floor plans, it is time to choose the right way to send this package to potential buyers. AirSend lets you share and organize large files and send messages to people with ease. The ability to drag and drop large files from a built-in file management system and send them all in one place makes sharing virtual tours and other materials fast and cost effective with AirSend. Other delivery system options include email, which can be clunky and hard to keep track of, and only placing the materials on your website, which is less personal.
Ready to make good virtual tours?
Source: unDraw
Just because potential buyers may not be able to visit homes in person doesn’t mean they can’t still do a home tour. Technology exists to solve our problems, and virtual tours can do a lot for real estate agents like us during these unusual times. Now that you have all of the information you need to create the best virtual home tours for your clients, it’s time to get moving. Good luck!
AirSend is a versatile digital workspace for real estate professionals to share files, send messages, and complete tasks. See how AirSend can help you as your business grows here.
File sharing/organization is one of the biggest requirements in a business communication tool. Nowadays, platforms, like Slack, offer integrations of personal file storage. But is this a secure option? Not a lot of people are open to the idea of connecting their personal file storage to a platform they use to work. AirSend has an alternative.
With AirSend, users can effectively share and secure files with our built-in file storage. There are multiple ways to create, share, and organize your files/folders. For example, with our newly designed wiki (notebook), the ideal knowledge storage, users can create and store multiple files and folders to come back to later.
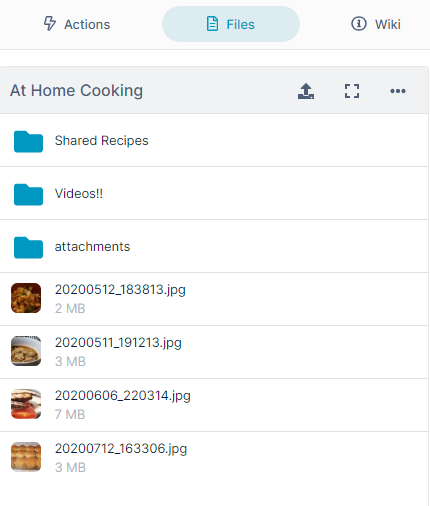
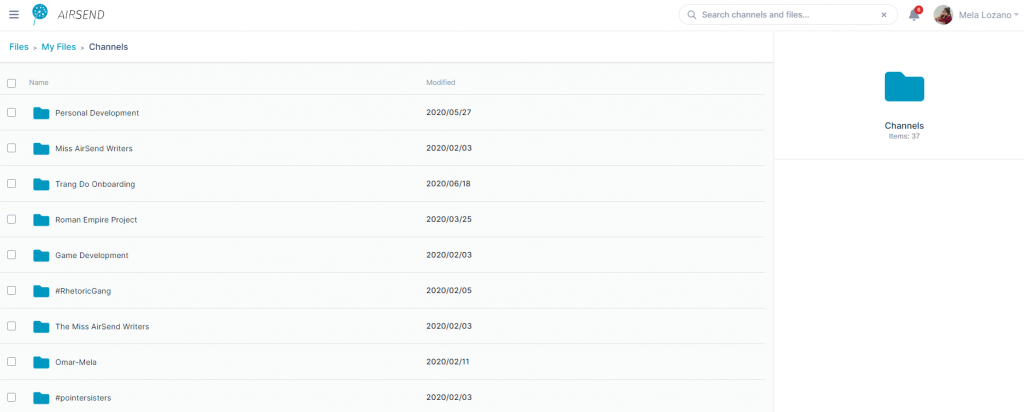
Another way to store and organize files is through the files tab located on the right-side panel.
And then, of course, you have your central file storage. All files, documents, and folders from all your channels can be found in the central file storage (image below).
The Best Ways to Share Files with Clients Using AirSend
Ultimately, there are many ways to share and organize your files with AirSend. We offer drag and drop functionality, Office 365 integration, Notebook, and best of all premium built-in file storage. You can now organize your folders and files the way you want.
Imagine, having various ways to collaborate, and organize files all from one space. Say goodbye to the extra tabs and extra accounts. And say hello to productivity. Don’t believe us? See what others are saying about us here.
AirSend is a versatile digital workspace to organize files, send messages, and complete tasks. See how AirSend can help you.
A quick tutorial on how to create a basic accounting channel template and how to use that template when bringing on a new client.
Onboarding a new accounting client involves a good amount of
paperwork and organization.
With AirSend, the ability to create a channel template and duplicate
that template means that you don’t have to go through the trouble of making, naming,
and organizing a new set of file folders each time you have a new client. After
creating the initial template, you will be able to digitally onboard clients with
a few clicks of your cursor.
Here’s a quick tutorial on how to create a basic accounting
channel template and how to use that template when bringing on a new client.
Step 1: Create A Channel
The first step is to create a new channel. You can call it
your “Template Channel,” “New Client Template,” or even “Client Last Name,
Client First Name (Template Channel).” Whatever makes it clear that this is not
a channel you are using to interact with clients but a channel template you
will use to onboard new clients.
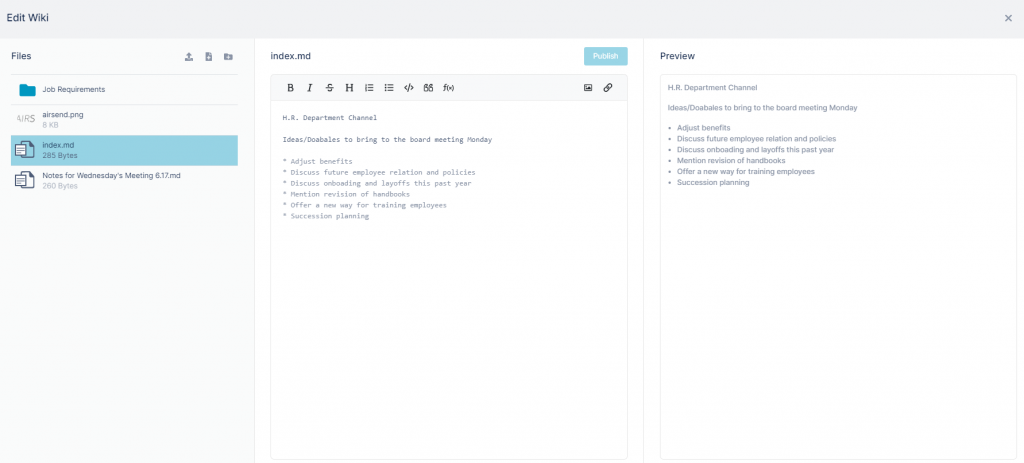
Step 2: Edit Your Wiki
The next step is to edit the Wiki section of your channel. You
can note down important information and even write a brief welcome message if
you intend for your clients to have AirSend accounts. Remember that this is
optional since clients can send and receive messages and files using their
email, too.
Step 3: Add Your Folders
The third step is to add the folders that you typically use
for each client. These will vary depending on your specialty and personal preference.
Some general ones include “Compliance Documents” — which will
contain blank copies of your accounting contract, GDPR statement and where you
will put the signed copies of those documents that your client provides, as
well as their proof of identity. “Welcome Documents” — which has your welcome
letter and a blank copy of your financial questionnaire in it. And “Financial
Documents” for tax records, bank statements, cash flow statements, balance
sheets, investment portfolios, and any additional financial documentation.
Step 4: Use Your Template Channel to Onboard New Clients
with Ease
Once your template is complete, you can use it whenever you
onboard a new client. Just duplicate the channel, rename it to your client
name, and easily send and receive messages and files!
As you can see, creating and using accounting channel templates in AirSend is easy and can make your onboarding process much faster and simpler.
AirSend is a versatile digital workspace for accountants to share files, send messages, and complete tasks. See how AirSend can help you as your business grows here.
Bookkeeping is the recording of financial transactions and is part of the process of accounting in business. Bookkeepers are responsible for recording and classifying accounting transactions of a business.
Bookkeeping is important in business accounting because it allows you to see where your business is spending money, where your revenue is coming from, and most importantly, which tax deductions you will be able to claim.
In this blog post, we are going to provide a beginner’s guide to bookkeeping. We will start with the basics: understanding assets, liabilities, and equity, and plenty more. After that, we will provide you with what is called the accounting equation, which forms the foundation of your bookkeeping and ultimately your business.
Next, we will briefly cover the difference between single-entry and double-entry bookkeeping. Finally, we will suggest and summarize some tools to help you get started with bookkeeping. Let’s dive in.
The Basics
Understanding the basics to bookkeeping will help you step into the right direction of running your business. So, what exactly are the basics? Well, for beginners, there are assets, liabilities, and equity. These three components form your balance sheet. It’s okay if you do not know what this means. That’s why we are here. Let’s take a closer look at what assets, liabilities, and equity are.
Assets: are cash, products, or services that your company owns. The can be from inventory to accounts receivables.
Liabilities: are things that your company owes. So this could be, what you owe to suppliers (accounts payable, loans, mortgages, etc.
Equity is the ownership a business owner and investor has in the business.
These three components are what form the accounting equation and what will become important for you in understanding the basics of bookkeeping. Don’t worry, we will explain how this all works later in the blog post. For now, let’s continue with some other basics that are good to know.
Accounts Receivable: in basic definition, accounts receivable is money owed to a company by its debtors. So, if your company sells products or services and doesn’t collect payment immediately, you have “receivables,” or money that is due from customers.
Inventory: is the unsold product. It is essentially money sitting on a shelf, but inventory is one of the most crucial assets that must be accounted for.
Fixed Assets: Fixed assets include any equipment, vehicles, land, or building that you own. These assets are usually large and highly valued.
Accounts Payable: is money that the company owes to suppliers, service providers, etc. These are usually the services/suppliers that help the business run.
Retained earnings: track any company profits that are reinvested in the business and are not paid out to the owners. This is crucial to track to see how your company is performing over a period of time.
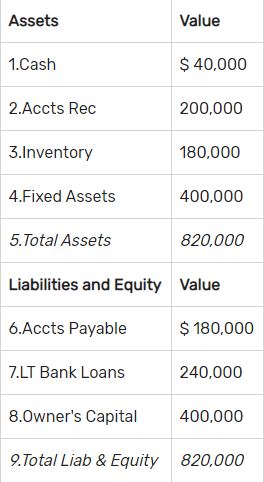
Okay, so now that we got the basics definitions out of the way, I am sure you are wondering what does all this even mean, or how does this apply to me? These terms are what balance the books. From assets to retained earnings, everything must be accounted for. Below is an image of what a simple balance sheet would look like, with the applied terms.
image of a balance sheet
So, knowing what balances the books, the remaining question is, how? The answer: the accounting equation.
The Accounting Equation
The basic accounting formula: Assets= Liabilities + Shareholders’ Equity
This equation must balance because everything the business owns (assets) has been purchased with some form of debt (liability) or shareholders’ capital (equity). So let’s give an example of how this looks like.
If a business has $20,000 in liabilities, $40,000 in assets, and $20,000 in shareholders’ equity the accounting formula would read:
If you know any two of the three components of the accounting equation, you can calculate the third component. To know if your books have balanced, remember that you compare your liabilities and equity to assets. As seen by the third equation, it balances.
Let’s dive a little deeper and give a transaction demonstration. Understanding how a transaction works will help you better understand the accounting formula. Understanding the accounting formula will help you learn how to balance your books.
How Transactions Work in Bookkeeping
So, when you start a new company, everything is zero. Remember your accounting formula: Assets = Liabilities + Shareholders.
0 = 0 + 0
Now, let’s say as the owner you want to deposit some money. You, as the owner, deposit $1,000. To make this easier, we are going to go with the double-entry bookkeeping system.
So, remember, if an owner has put money into his/her business (investing), then this is called equity. Remember, also, that assets are products, services, and cash that the company owns. By investing $1,000 into the company (equity), the company simultaneously now has an asset of $1,000. So, lets put this into the accounting equation.
Assets = Liabilities + Shareholders’ Equity.
$1,000 = 0 + $1,000
To help your business run, you purchase a $700 laptop on your business credit account. This is seen as a liability (money that we owe) because the $700 is on a credit account. So, let’s head back to our equation.
Assets = Liabilities + Shareholders’s Equity.
$1,700 = $700 + $1,000
An asset or liability account is created for each type of asset. The asset account (and total assets) for office equipment was increased by $700 and the liability account for the company’s credit card was increased by $700.
Think of this as a checks and balance system. So, now that you have everything you need to balance your books, let’s talk about which forms of bookkeeping are right for you.
Single-Entry vs. Double-Entry Bookkeeping
Bookkeeping is what makes your business survive. A business also survives on the person’s ability to establish good accounting practices. This is where deciding if single-entry or double-entry bookkeeping works best for you. Spoiler alert: everyone uses double-entry. But, what would we be if we didn’t at least mention single-entry bookkeeping?
Single-Entry Bookkeeping:
Works if your business is super small
Similar to keeping a personal checkbook
One entry is made for each transaction
Does not track inventory, accounts payable, and accounts receivable
Does not work in developing a balance sheet
Double-Entry Bookkeeping:
Each account has two columns and each transaction is located in two accounts
An example of how double-entry bookkeeping works can be seen from “The BalanceSmall Business,”
“An example of a double-entry transaction would be if the company wants to pay off a creditor. The cash account would be reduced by the amount the company owes the creditor. That would be the debit. Then, the double-entry reduces the amount the business now owes to the creditor account as it has received the amount of the credit the business is extending. That is the credit.”
BalanceSmall Business, 2019
Ideally, double-entry bookkeeping is the better solution. You can track more and accurately calculate the profit and loss of your business. If your business is extremely small, then perhaps, single-entry bookkeeping may be the better option. Finally, let’s look at some tools that can help with your bookkeeping.
Accounting Software
After studying the latest accounting software, we have come up with four tools that we believe may help with bookkeeping. Note, we are not accounting experts, and have made this list solely off of review, research, and case studies. We have not tried any of these tools ourselves.
Quickbooks: is very popular for accounting software. Quickbooks focuses on helping small businesses simplify and do their books.
Xero: is a QuickBooks alternative. Xero manages invoices, bank reconciliations, and bookkeeping.
Sage: Accounting software, or bookkeeping software, automates, organizes, and integrates typical financial transactions, helping a business run more smoothly every day
Kashoo: Mobile and online accounting software for small business that provides a cloud-based system for invoicing, expense tracking & bookkeeping.
In this blog post, we are going to be detailing the latest AirSend Android updates. This week we provided some new updates to our app:
Wiki editor
Notifications
Public Channel Support
Copy files
Wiki Editor
You can now update your wiki in the app! All you have to do is click on the channel you want to edit your wiki in, slide on over to the wiki tab, and start editing. Having the ability to edit/add notes to your wiki is efficient.
The wiki is a great place to store knowledge for later. Add notes, files, folders, and tidbit reminders that way you and everyone in your channel will remain in the loop.
Notifications
With the latest AirSend Android update, you can now view your conversations at a glance and even reply from your notification. You can also access the channel directly from the notification. Having this new feature allows for seamless and efficient communication.
Public Channel Support
You can now access and create your communities through our public channel feature via app. Build, inspire, and communicate with your community across the web and phone.
A little bonus, to see what you need to build a successful community, read our blog post.
Copy Files
Finally, in our AirSend Android update, you can copy your files from one channel to another. So any document templates you uploaded from one channel, you can now simply copy and paste it to another channel. Best of all, this all happens from the File tab, so you don’t have to exit and enter into various channels.
Here are a few ways to stay healthy while working from home.
Once considered a luxury, working from home is now a reality
for many people due to COVID-19 and the ever growing remote work trend. In
theory, working from home sounds great. You’re in your own space. The
refrigerator is in walking distance. You get to use your own bathroom instead
of braving public restrooms throughout the work day. But despite the positives,
there are some downsides to working from home.
Because you’re home, some of the things that would come more naturally in an office — like working set hours or socializing — don’t happen without extra effort on your part. And these things are important to maintaining your mental and physical health. Here are a few ways to stay healthy while working from home.
Have set work hours
Source: unDraw
One of the benefits of working from home is that gives you more flexibility on what hours you do your work. That’s great, but exercising some discipline here is essential to creating work / life balance. Make sure you schedule what hours you are going to work, when you are going to take breaks, and what time the work day is over. Creating a schedule that you stick to makes sure that you don’t over- or under-work and helps to separate your work life from your home life.
Have a separate workspace
Source: unDraw
Working from home is great because all your creature comforts are within walking distance. Working from home can be disastrous for the same reason. Never leaving your bed, being constantly distracted by pets, kids, or your significant other, experiencing back pain because you’ve slouched on the couch all day — these can all be avoided by having a separate workspace. If you’re unable to have a full home office with a door that you can close to avoid distraction, at least designate a desk or space where you work everyday.
Move around
Source: unDraw
Speaking of back pain, make sure you move around during your scheduled breaks. Take a walk, do a ten-minute exercise video, or even some jumping jacks next to your computer. If you can go outside, even better. The flip side of the convenience of working from home is that the physical movement that is usually built into your work day no longer happens unless you make it happen.
Socialize
Source: unDraw
Last but not least, don’t forget to socialize. This can be having
a virtual game night with friends, calling your family, or enjoying an at-home
happy hour with your co-workers over Skype. Regular social interactions are
essential to mental health, especially during uncertain and stressful times.
Many people are struggling right now. If you are too,
remember that all difficult times come to an end and that what we can do now is
to try our best to take care of ourselves and the people around us. Whether you’re
happy to work from home or itching to get back to the office, follow these work
from home tips and suggest them to your friends and family so that everyone can
maintain their best mental and physical conditions.
Capture of AirSend file preview and Office icon
Introducing AirSend’s latest update: Office 365 integration. With the latest Office integration, you can now enjoy the leisure of easy access to your office tools. Take leisure in editing your documents, spreadsheets, and powerpoints all with a click of a button. Anything you edit will be saved to your original file. This means no more deleting or uploading the same file.
Video of Office 365 Integration
With our new update, you can now edit documents on-the-go. Additionally, you can now spend more time with your clients knowing that all your files and documents are up-to-date with AirSend. For more updates, check out our AirSend blog.
AirSend is a versatile digital workspace to share files, send messages, and complete tasks. See how AirSend can help you.
Have conversations, share files, complete tasks, and get work done in one space.