We are back with another blog post on How to Build an Online Community with AirSend vs. Discord. We recently wrote about Discord vs. AirSend: Roles and Permissions Explained, which you can read about by clicking here. In this blog post, we will be explaining how to jumpstart your community with a basic setup of your community through AirSend and Discord.
When creating a community, it is important to consider the following:
- Choosing your niche
- Choosing the right platform
Picking your niche is easy, however, when choosing the right platform, things can get a little tricky. There are many factors to consider when choosing the perfect platform to host your community. Factors, such as:
- User friendly
- Visually appealing
- Welcoming
Now that we’ve covered what factors and considerations need to be taken into creating a community, let’s talk how to design your community. Let’s begin with AirSend.
AirSend
AirSend is a great platform to build genuine relationships through an intimate conversation space.
With an AirSend community, users can experience:
- Clean and organized design
- Full control over your community
- Deep connections and profound conversations
Here’s how to build a community with AirSend.
How to Build a Community with AirSend
Step One: Creating a public channel
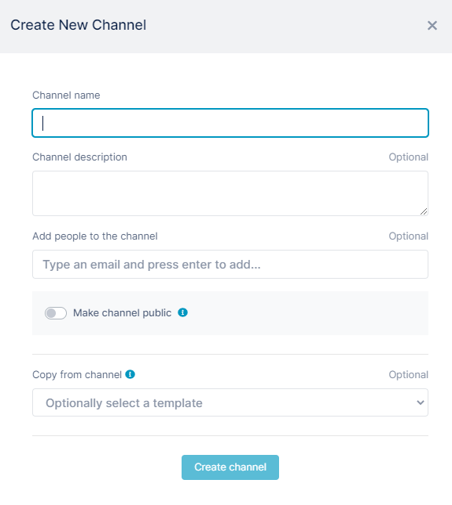
- Type your community name in the “channel name” section.
- Provide a description for your community in the box titled, “channel description”
- Check off “make channel public”
Step Two: Customize your Community with Logos and Backgrounds
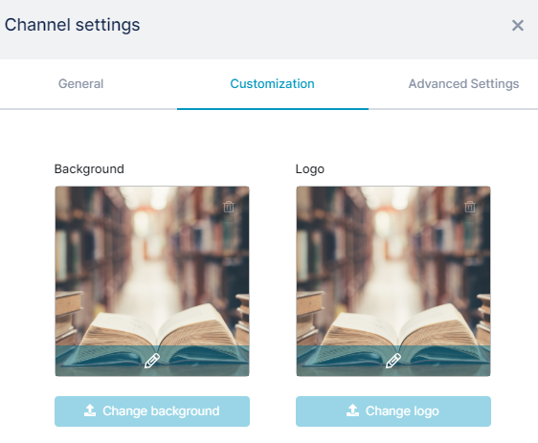
Found in your settings, users can customize their community with a background and logo. Here are the steps:
- Go to your settings (marked as the three-geared icon)
- Click on the “customization” tab
- Upload your background and logo image
Step Three: Customize your Community with a Built-in Guidebook
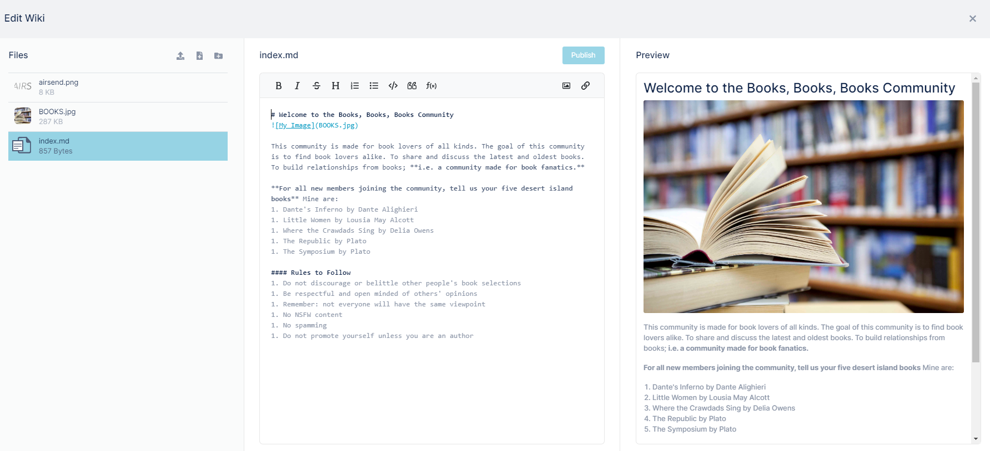
Your bulletin board/guidebook is the golden area to advertise what your community is all about. Here are the steps to customize your community:
- Click on the pencil icon to edit your guidebook
- Upload your pictures and links
- Customize your community with different headings
Step Four: Customize your Folders
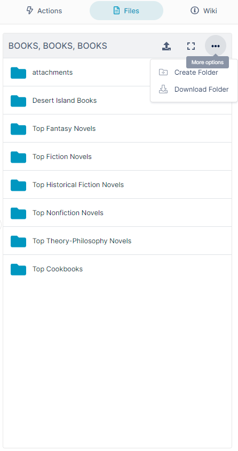
Having folders is a great way to keep track of anything mentioned in your community. Instead of scrolling through so many conversations, find the thing you are looking for through a designated folder.
To create your folders:
- Click on the three dots located on the right-hand side
- Click “create folder”
Once you are done creating your folders, the last task is to assign member roles.
Step Five: Assign Member Roles
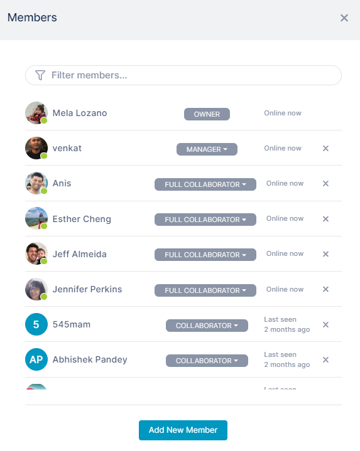
After adding your final cosmetics to your community, it is time to assign member roles. Providing roles allow for stability and organization within a community. The roles AirSend offers are:
- Viewer: Read messages, wiki, and download files
- Collaborator: Post messages, read wiki, files, and actions
- Full Collaborator: Post messages, edit the wiki, and upload files and images
- Manager: Same as a full collaborator and manage users
- Admin: Full control of the channel and change member roles
The great thing about designing a community with AirSend is that it takes no time at all. With our user-friendly platform, communities can build close conversations through clean designs and intimate conversation space.
Discord on-the-other-hand is a more complex platform. Their platform is known for its unlimited customization, which can be a good thing and a bad thing.
How to Build a Discord Community
Discord takes the approach of dynamic user roles. What we mean by dynamic user roles is customized user roles. On top of that, users can customize channel preferences, add bots to run and stabilize servers, make private channels, and many more. However, with many customizations comes many complexities. And with many complexities come some difficulties in using Discord. One difficulty that is apparent when using the platform is its use of customized roles.
For example, Server A has specified permissions for its members. Members have permission to:
- Post in channel
- Share files
- Invite other members to the community
Now, let’s say we want to join another community, Server B. Because there is full-fledged customization, creators of the server can check off specified permissions for their roles that may be different from other servers. In Server B, members can have permission to:
- Post in Channel
- Share files
- Add reactions
But they cannot invite other members to the community like Server A can. Members cannot view what permissions they have. Now, imagine this with higher roles.
Let’s say there are Moderators in Server A and Server B. Server A has specific permissions to kick members out. In Server B, those same moderators from Server A do not have the permission to kick members out. This is not apparent to the moderators, thus confusion and complexities are formed.
Having customized roles is not always a bad thing. For some this can be a huge plus. It is also important to note that having so many ways to customize a Discord community also means having to spend a lot of time getting it ready.
Here is how to set up your basic Discord community.
Step One: Create a Discord Community Server
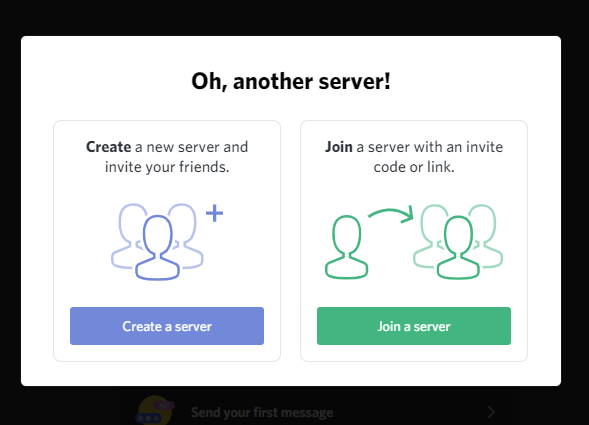
- Click on the large green plus icon in the bottom left-side panel
- Click on “create a server”
After creating your server, it is time to name your community and upload an image.
Step Two: Customize your Community- Name and Server Image

After creating a server, Discord will ask you what to name your server. Once you created a name for your server, go to your server settings to upload your desired image. Once you upload your community image, it is time to customize your user roles according to the Discord community you want to create.
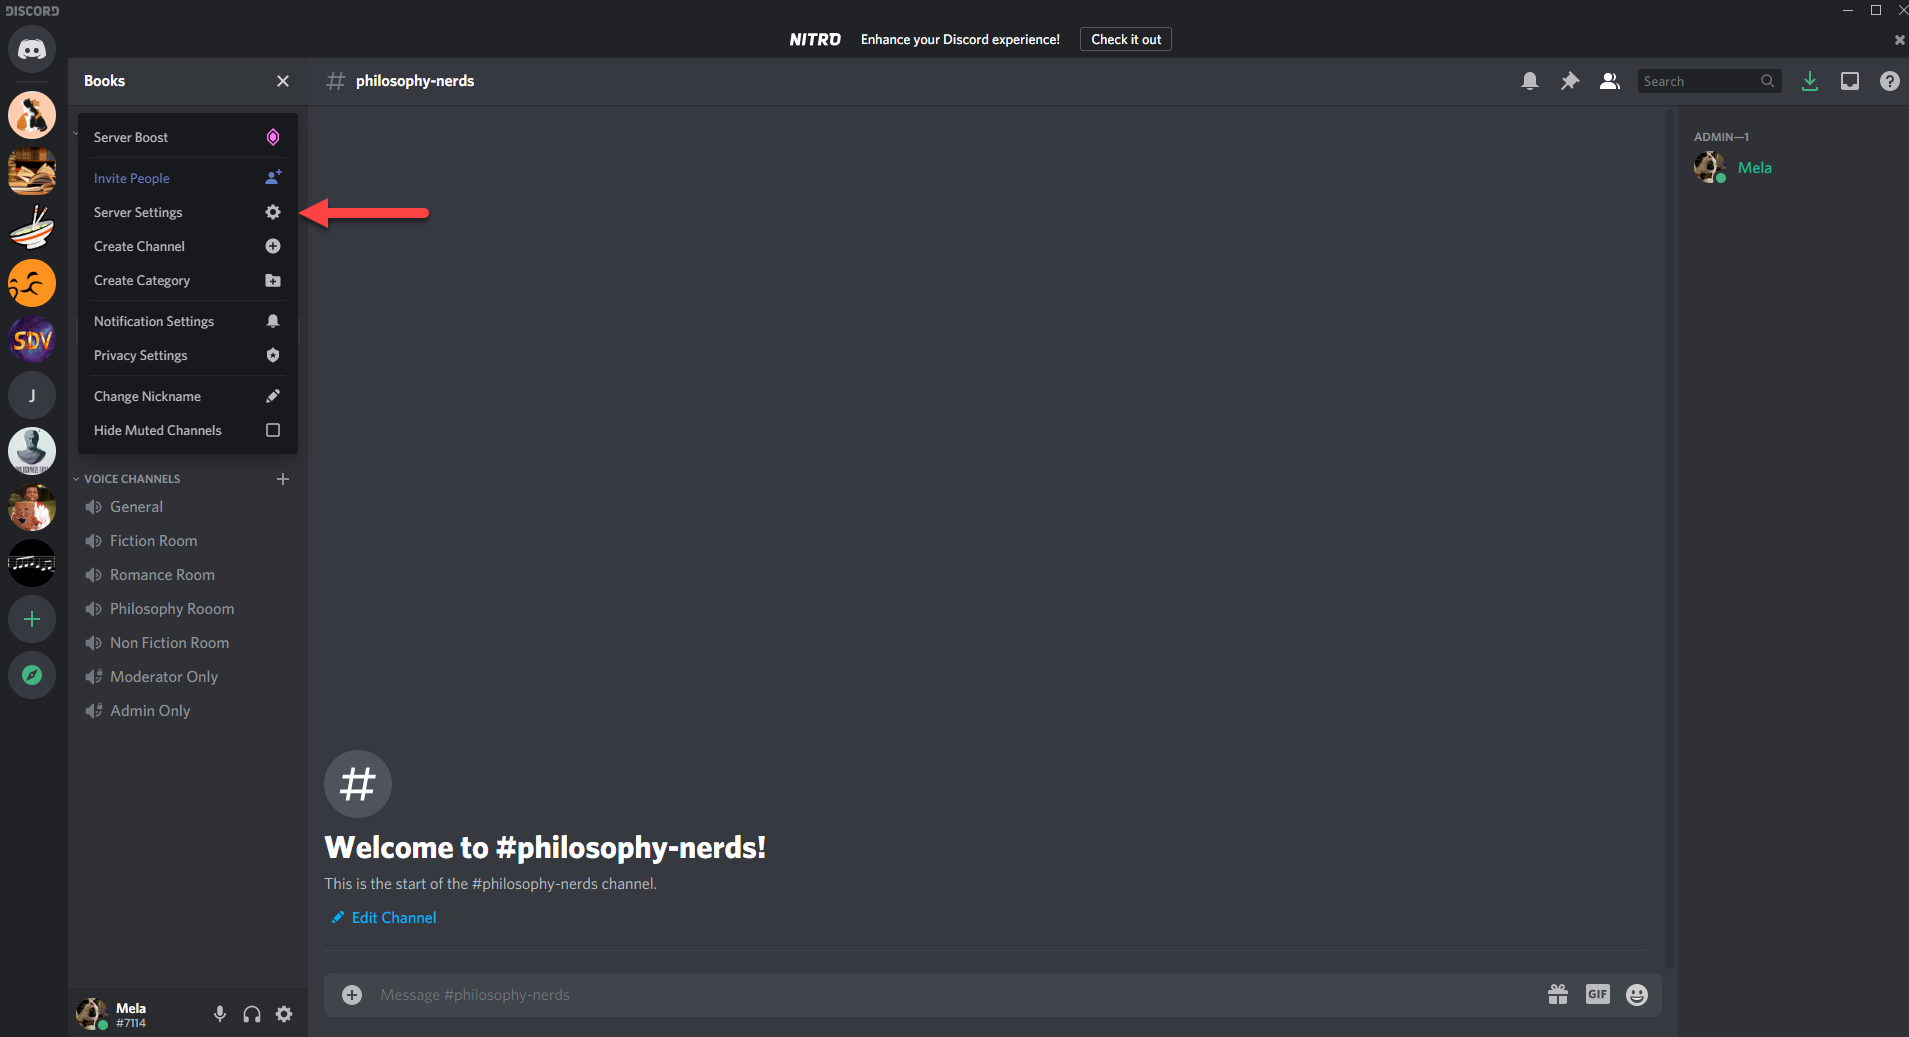
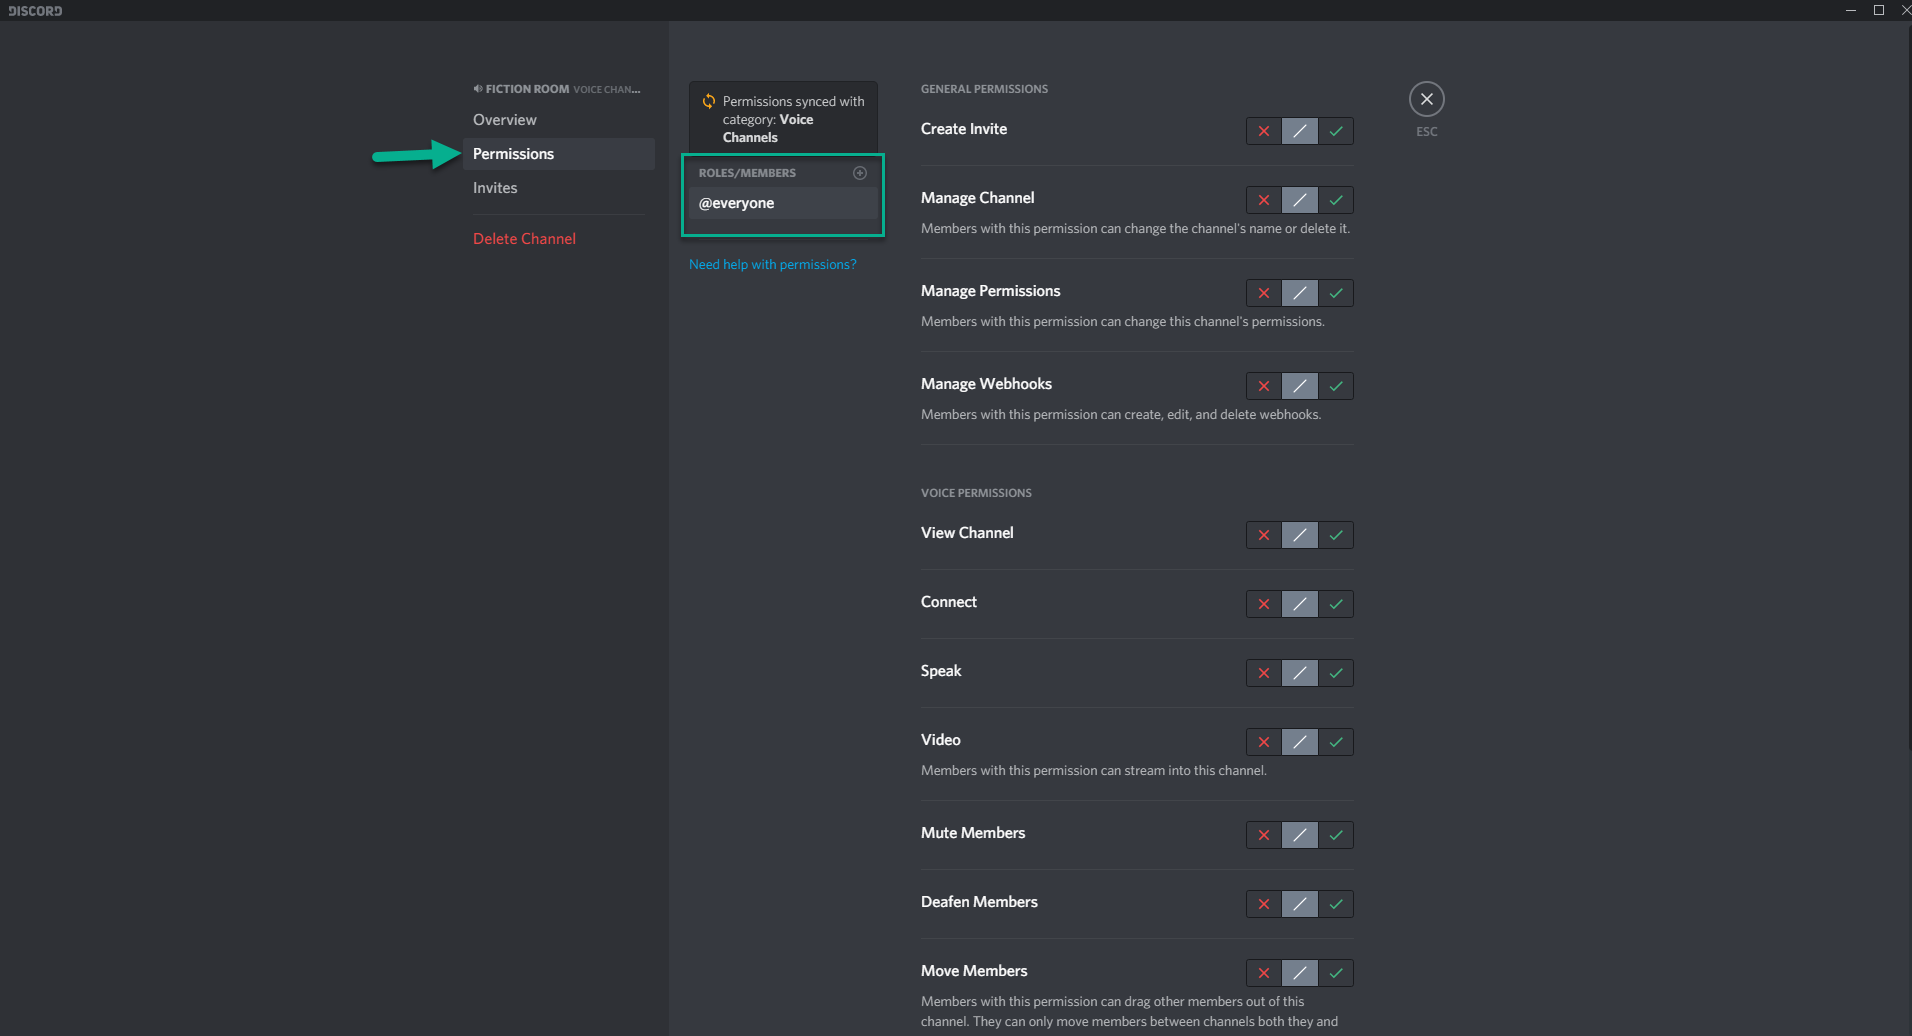
Step Three: Assign Customized Roles for Your Discord Community
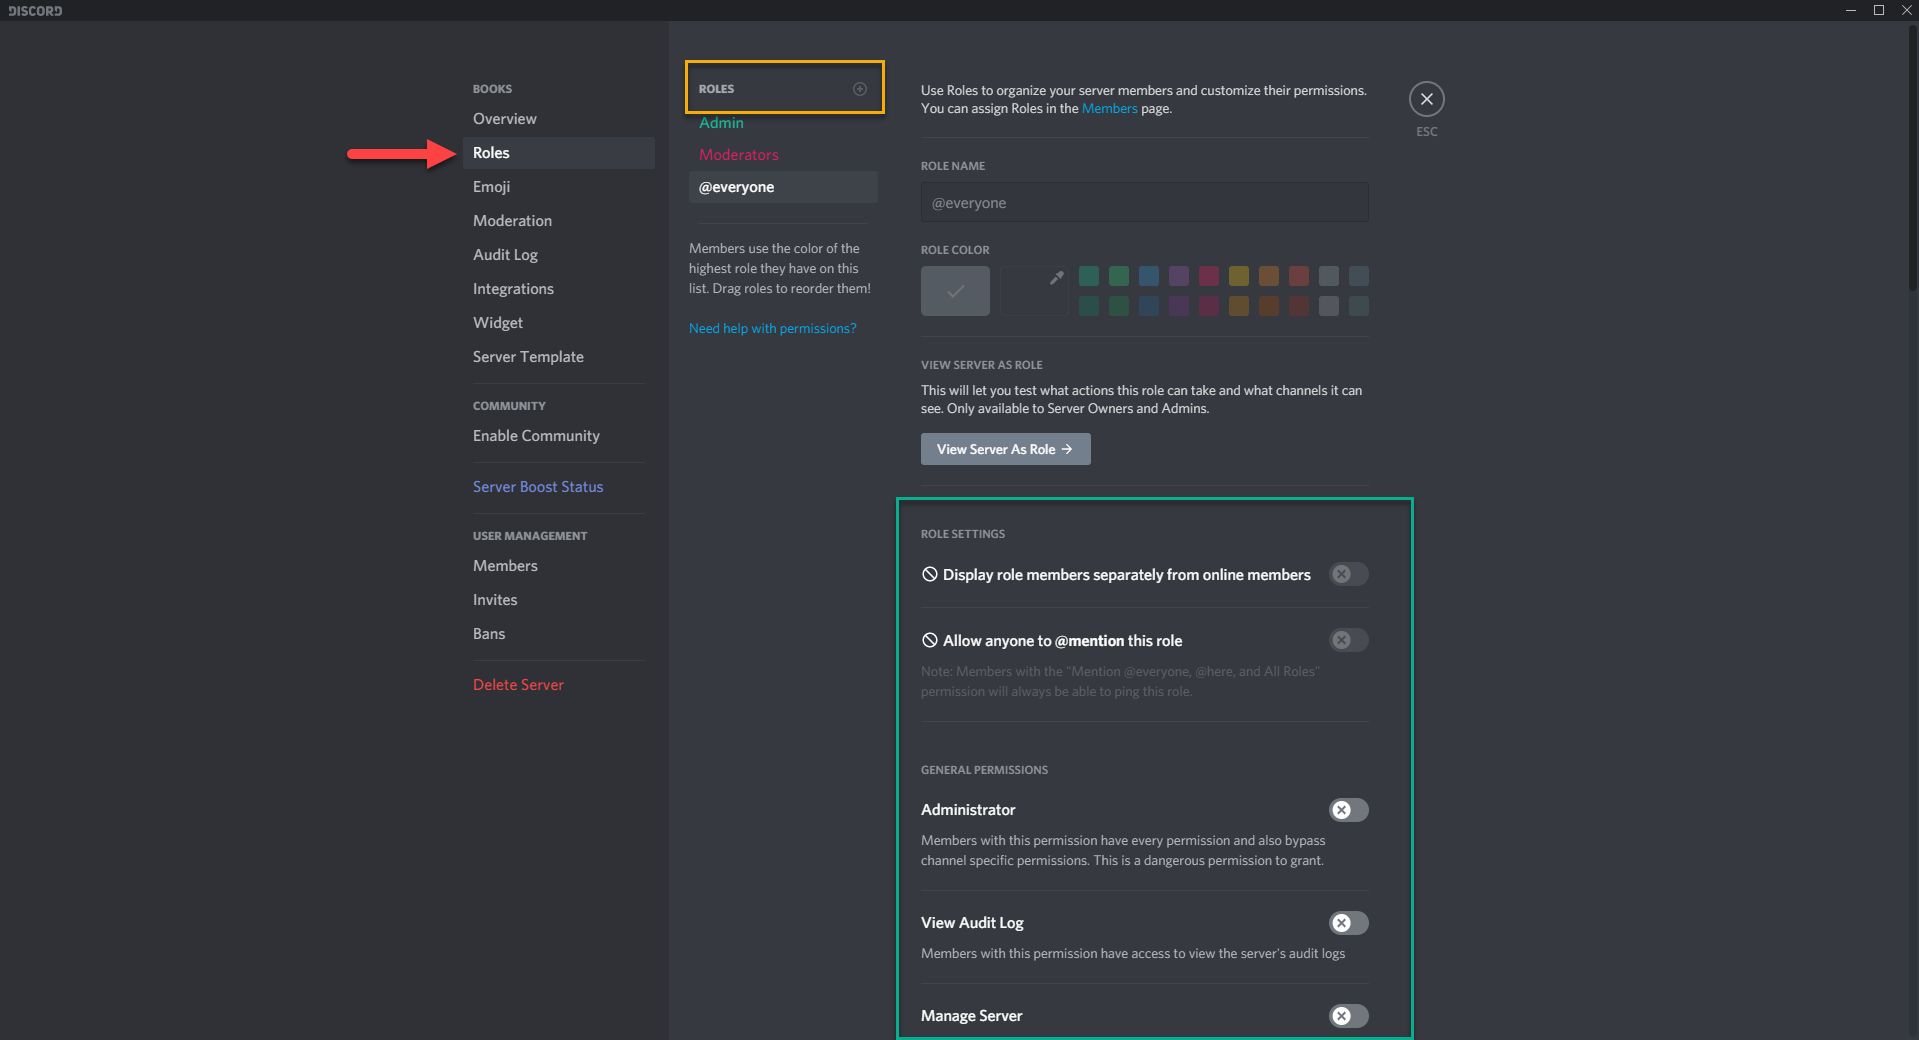
Once you are in the sever settings, click on the button labeled as roles. The image above should be what you are currently seeing. In the image above there is a yellow box. In the yellow box is a plus icon. Click on the plus icon to create new roles.
In the green box, are all the functionalities a role member can have. Each role has customized permissions to a channel. And each role carries a customized name. These names can range from Admins, Community Manager, Mods, Helpers, Servers Guide, etc.
Once all your roles are established, the next step is to create all your channels.
Step Four: Creating Channels
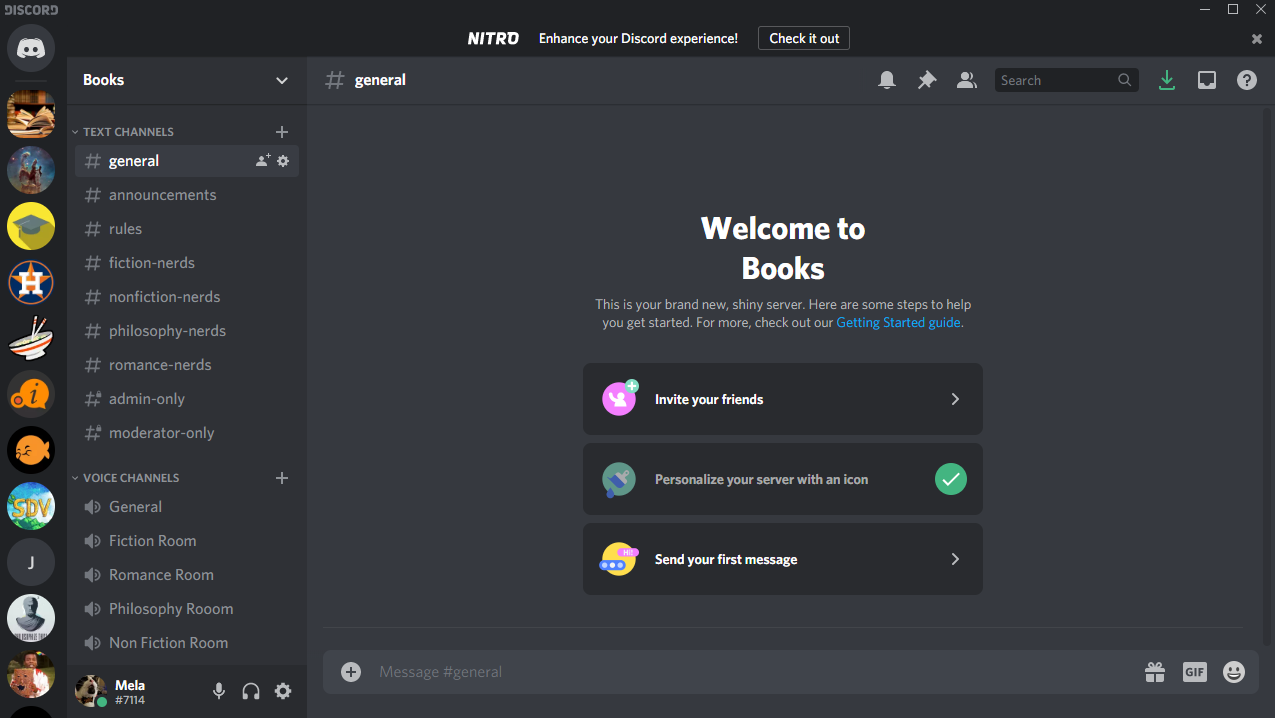
Noted in the image above is a Discord community. As one can see, there is a list of channels and audio channels. Normally the standard channels to have in a Discord community are:
- Announcements
- Rules
- General
- Private Channels
- Extra channels that apply to the community
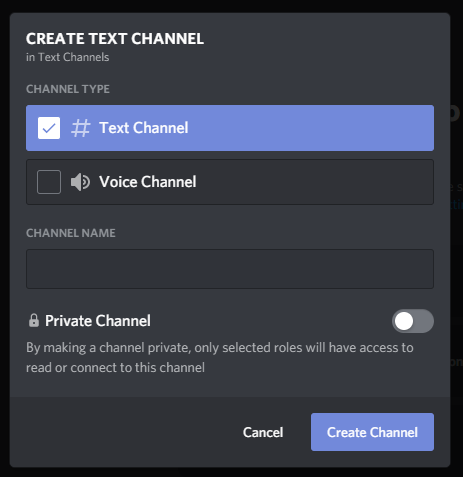
To create channels, click on the small plus icon next to “text channels” and “voice channels.”
When you create a channel, Discord will ask if you want to create a text channel or a voice channel. After you selected your channel type, you will need to input a channel name.
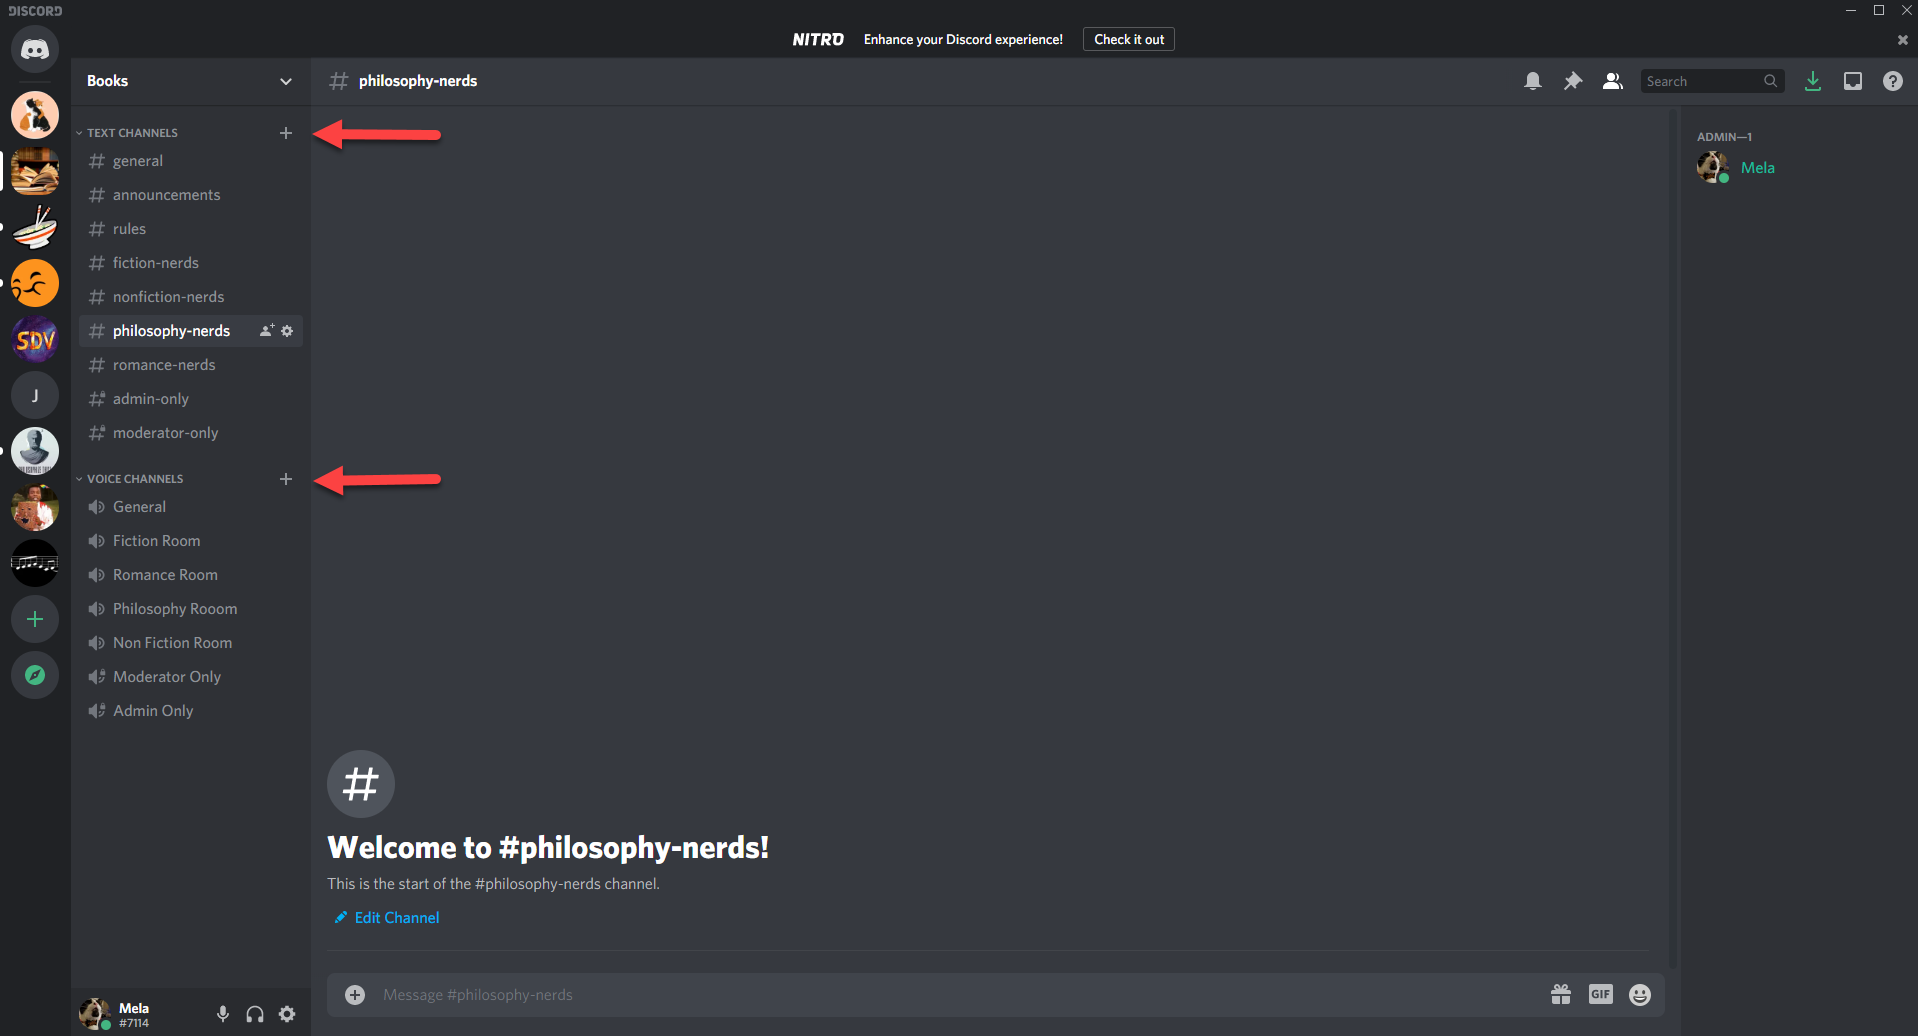
As mentioned before, users can create private channels. Private channels mean member access-only. In other words, an admin-only channel means only admins can view the channel. The same thing with moderator-only channels. Only moderators can view the channel.
Having multiple channels is both good and bad. The great thing about having multiple channels in Discord is that it ensures organized communication. The bad thing is that if you are a small group of friends, organized communication is not necessary- especially for people who do not prefer extensive customization options.
The Dilemma with Discord
The dilemma with Discord is that sometimes it can be a mental overload for people. The Discord community server can be a lot to handle with choosing various customized roles and setting up customized channel preferences.
Further, Discord is not perfect for small communities. Small communities only need one stream of conversation. Not a platform that has a plethora of channels that carry different conversations.
For example, let’s say a group of friends decide to set up a group chat. Because Discord offers unlimited channels, most users feel the need to create subject-oriented channels.
For instance, having a group of channels labeled fitness and adventures. The text channels would be labeled as hiking, images, online workouts, yoga, and strength training. Then you would have audio channels labeled as workout rooms one, two, and three.
Then you have another group of channels labeled as food adventures. Several text channels could include recipes, images, and city-based restaurants. Because of the multiple subject-oriented rooms, it can be difficult for users to decide which channel they want to use for an ongoing conversation.
For instance, having a conversation about restaurants that transition to the topic of recipes would suggest a user might want to switch to the recipe channel. And if they don’t switch, what is the point of creating the various channels in the first place?
After your channels are set up, it is time to set up your channel preferences.
Step Five: Setting Channel Preferences
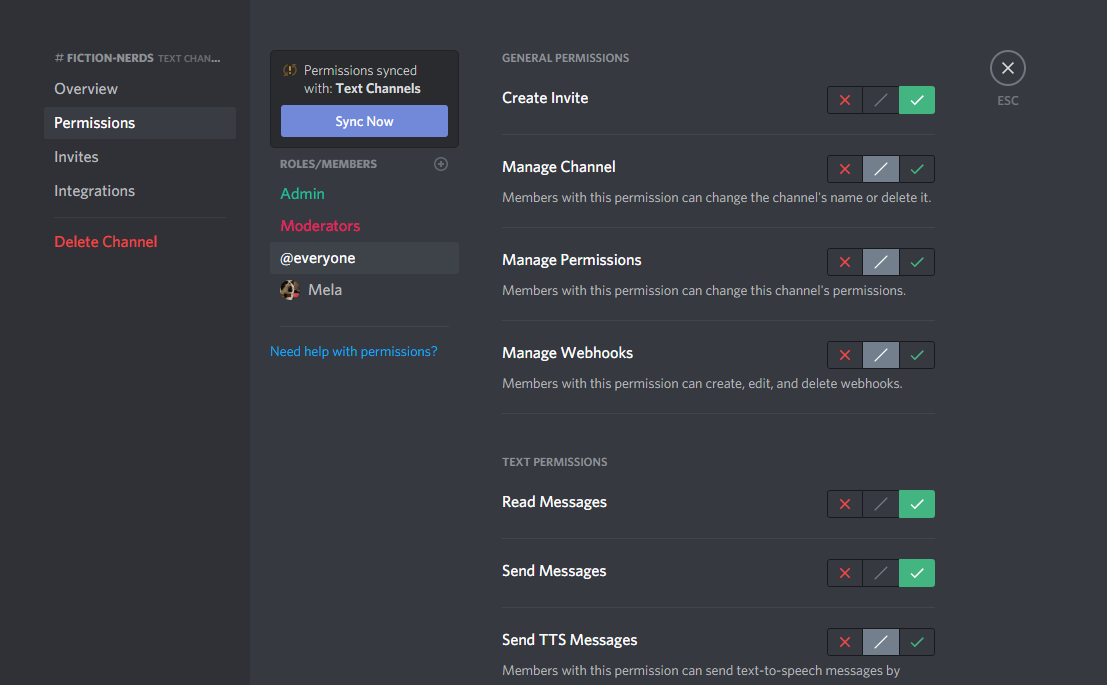
Yes, setting up channel preferences. Not only do you get to set up customized member roles, but you also can set up specific permissions for each member in each channel.
Hover over the channel you want to set preferences for. Once you hover over the channel, there should be a small gear icon located to the right of the channel name. Click on that.
Next, click on permissions. To customize permissions for each member, click on the small plus icon under labeled as roles and members. In the image below, roles and members should be in the green box. There will be a drop-down menu that appears with a list of roles.
You will have the ability to customize channel permission for each role. The customized preferences can be different for each channel you created.
Now that your basic community is set up, it is time to promote your community.
Step Six: Promoting your Community
You can even how to make a Discord server public by following these easy steps. This can give your community a wider reach.
Now, if all these steps that I mentioned confused you, don’t worry. We made a video that shows you how to create a community with AirSend and Discord.
How to Create a Community with AirSend and Discord
Summary
Ultimately, both platforms are great to use to start your community. If you want something easy to maintain with a clean design, AirSend is the choice. However, if you want a platform with the bells and whistles attached, creating a Discord community may be the wiser choice.